> ## Documentation Index
> Fetch the complete documentation index at: https://docs.rootly.com/llms.txt
> Use this file to discover all available pages before exploring further.
# Configuring Process Steps
> Customize retrospective process steps in Rootly with titles, requirements, role assignments, due dates, and reminder configurations to standardize follow-ups.
Retrospective process steps define the work responders should complete after an incident. Each process is made up of ordered steps that can be customized to match your organization’s retrospective workflow.
Each step is displayed in a list under the incident's Retrospective tab for them to follow while completing the Retrospective.
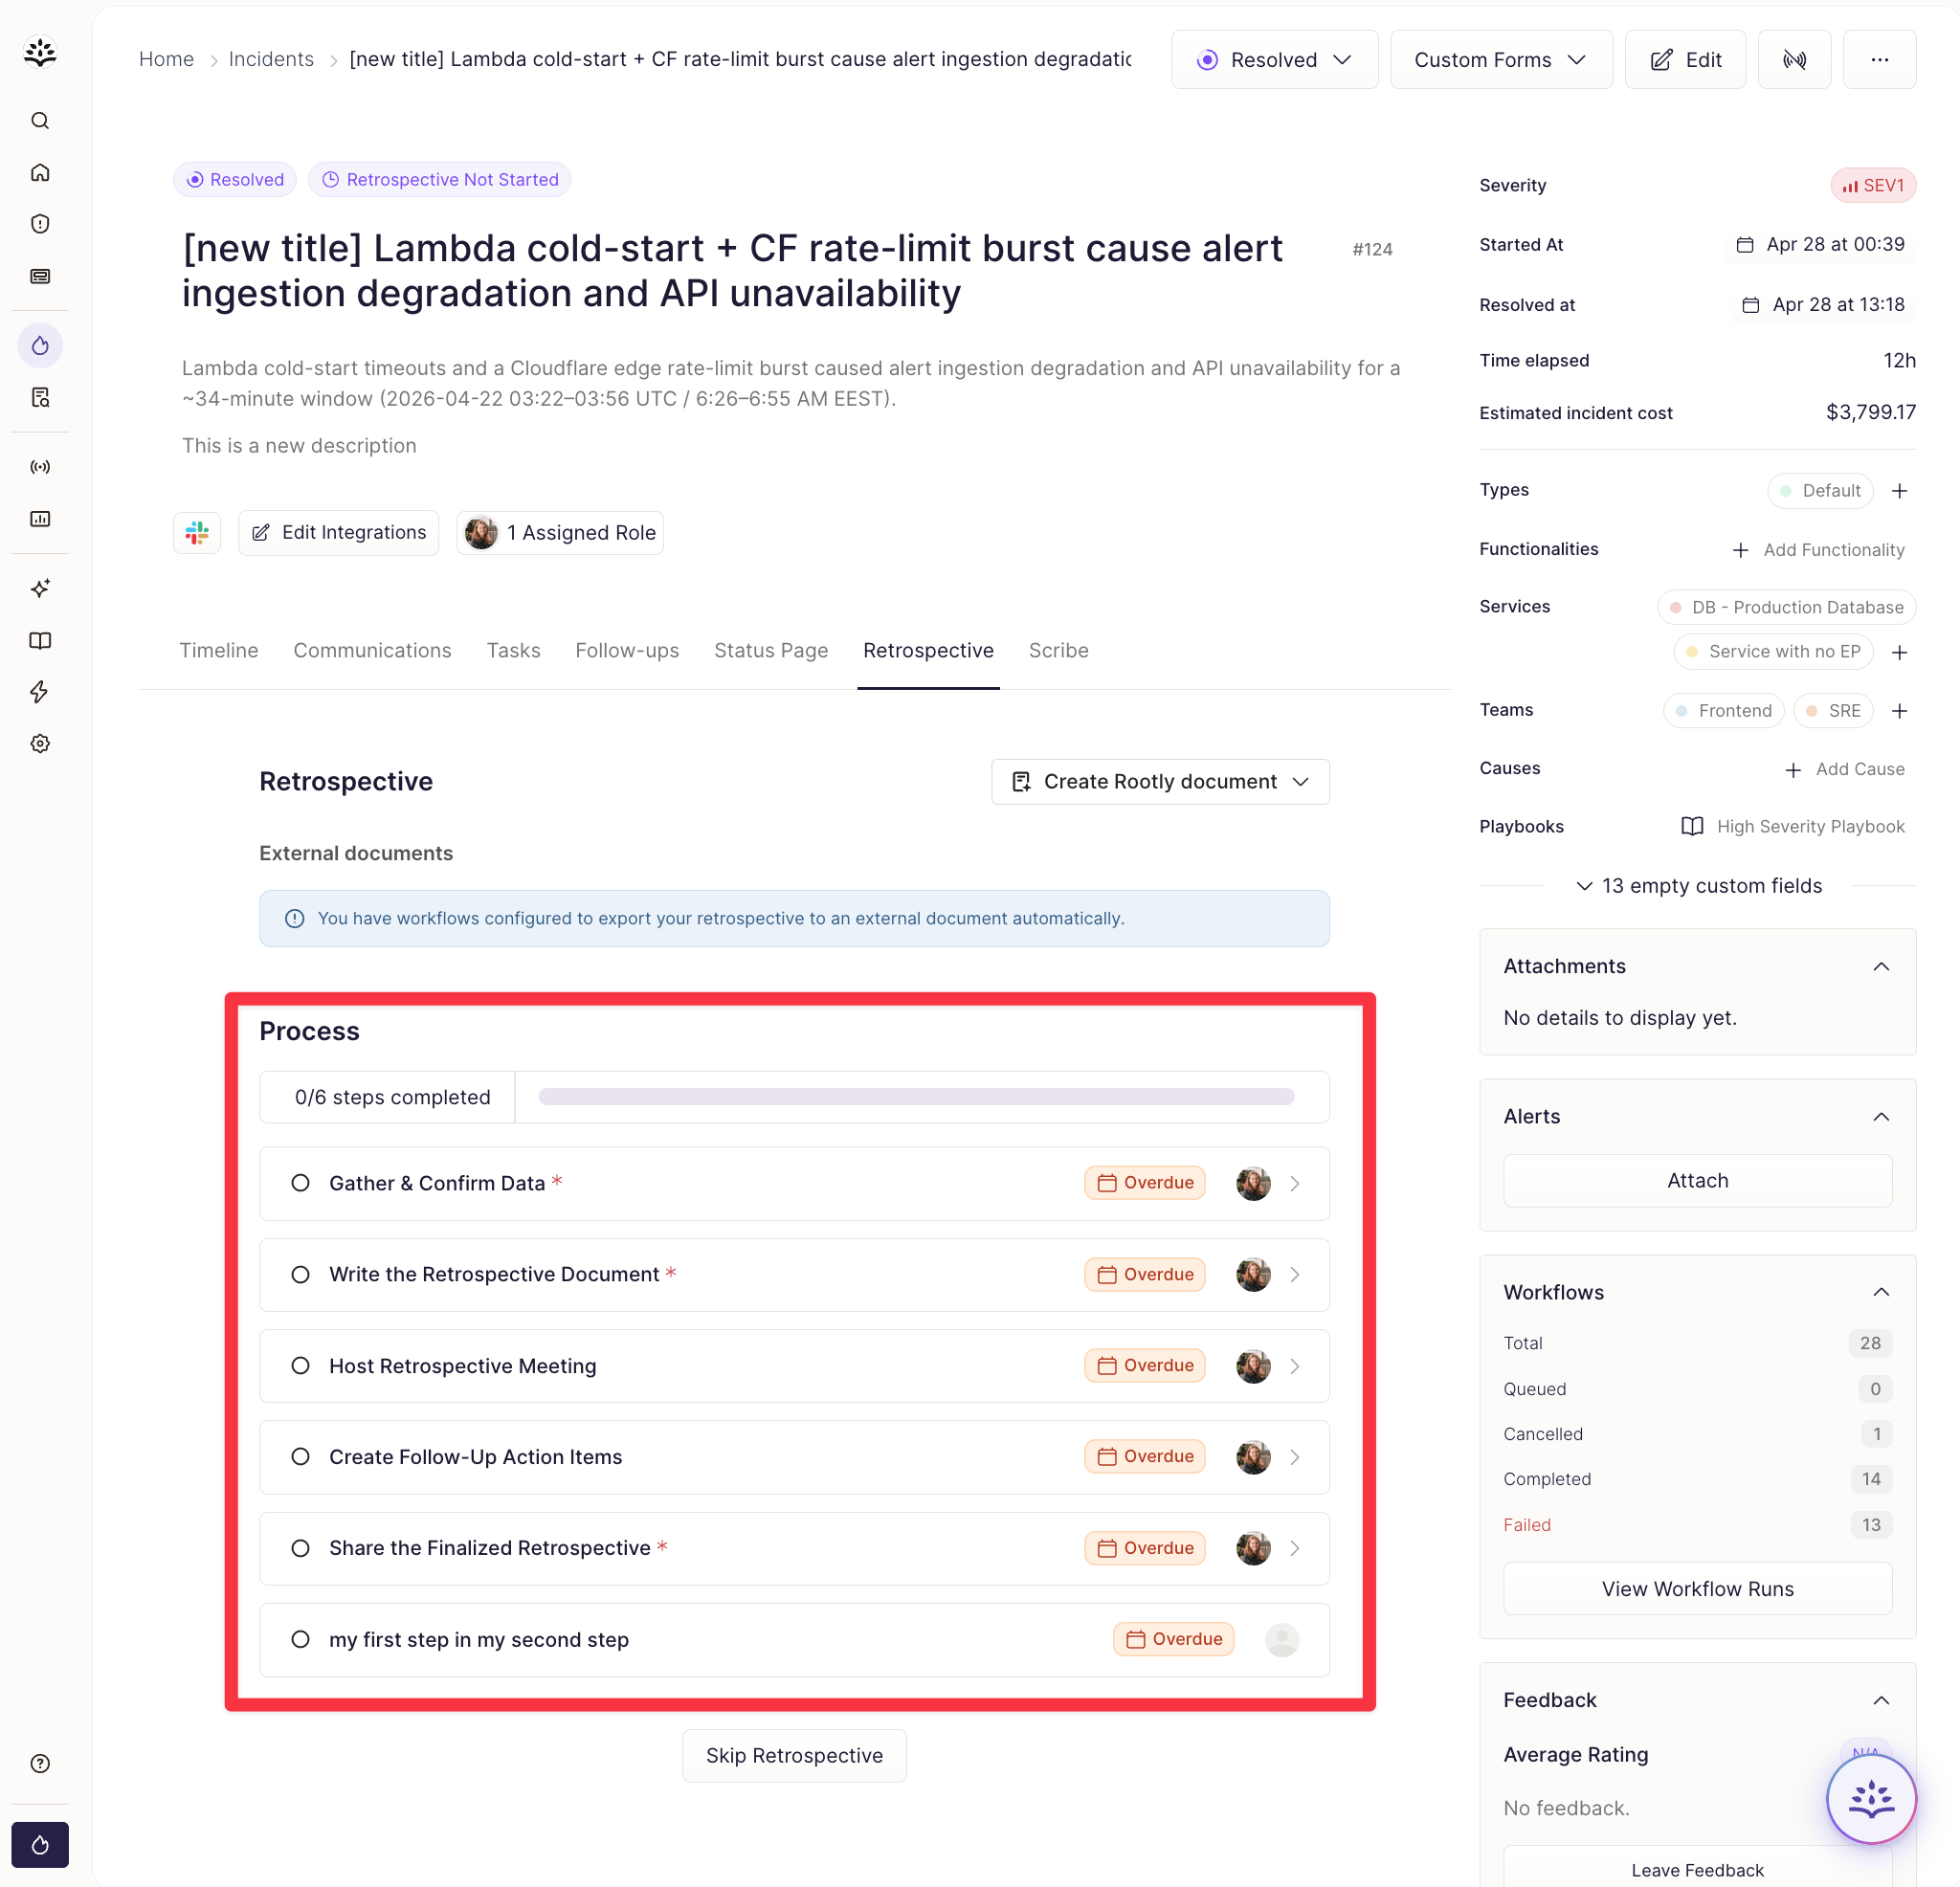 You can configure each step with:
* A title and description
* Required or optional completion
* A default owner based on an Incident Role
* A due date based on when the incident was resolved
* Slack and email reminders for the step owner
Each Process must include at least one step.
## Editing the Default Process
You are able to add additional steps to your Default Process: remember, the Default Process will be used if no other Custom Processes match the incident.
Note that there are a few built-in steps in your Default Process. These steps are marked with a `Built-In` label in the Process editor.
You can configure each step with:
* A title and description
* Required or optional completion
* A default owner based on an Incident Role
* A due date based on when the incident was resolved
* Slack and email reminders for the step owner
Each Process must include at least one step.
## Editing the Default Process
You are able to add additional steps to your Default Process: remember, the Default Process will be used if no other Custom Processes match the incident.
Note that there are a few built-in steps in your Default Process. These steps are marked with a `Built-In` label in the Process editor.
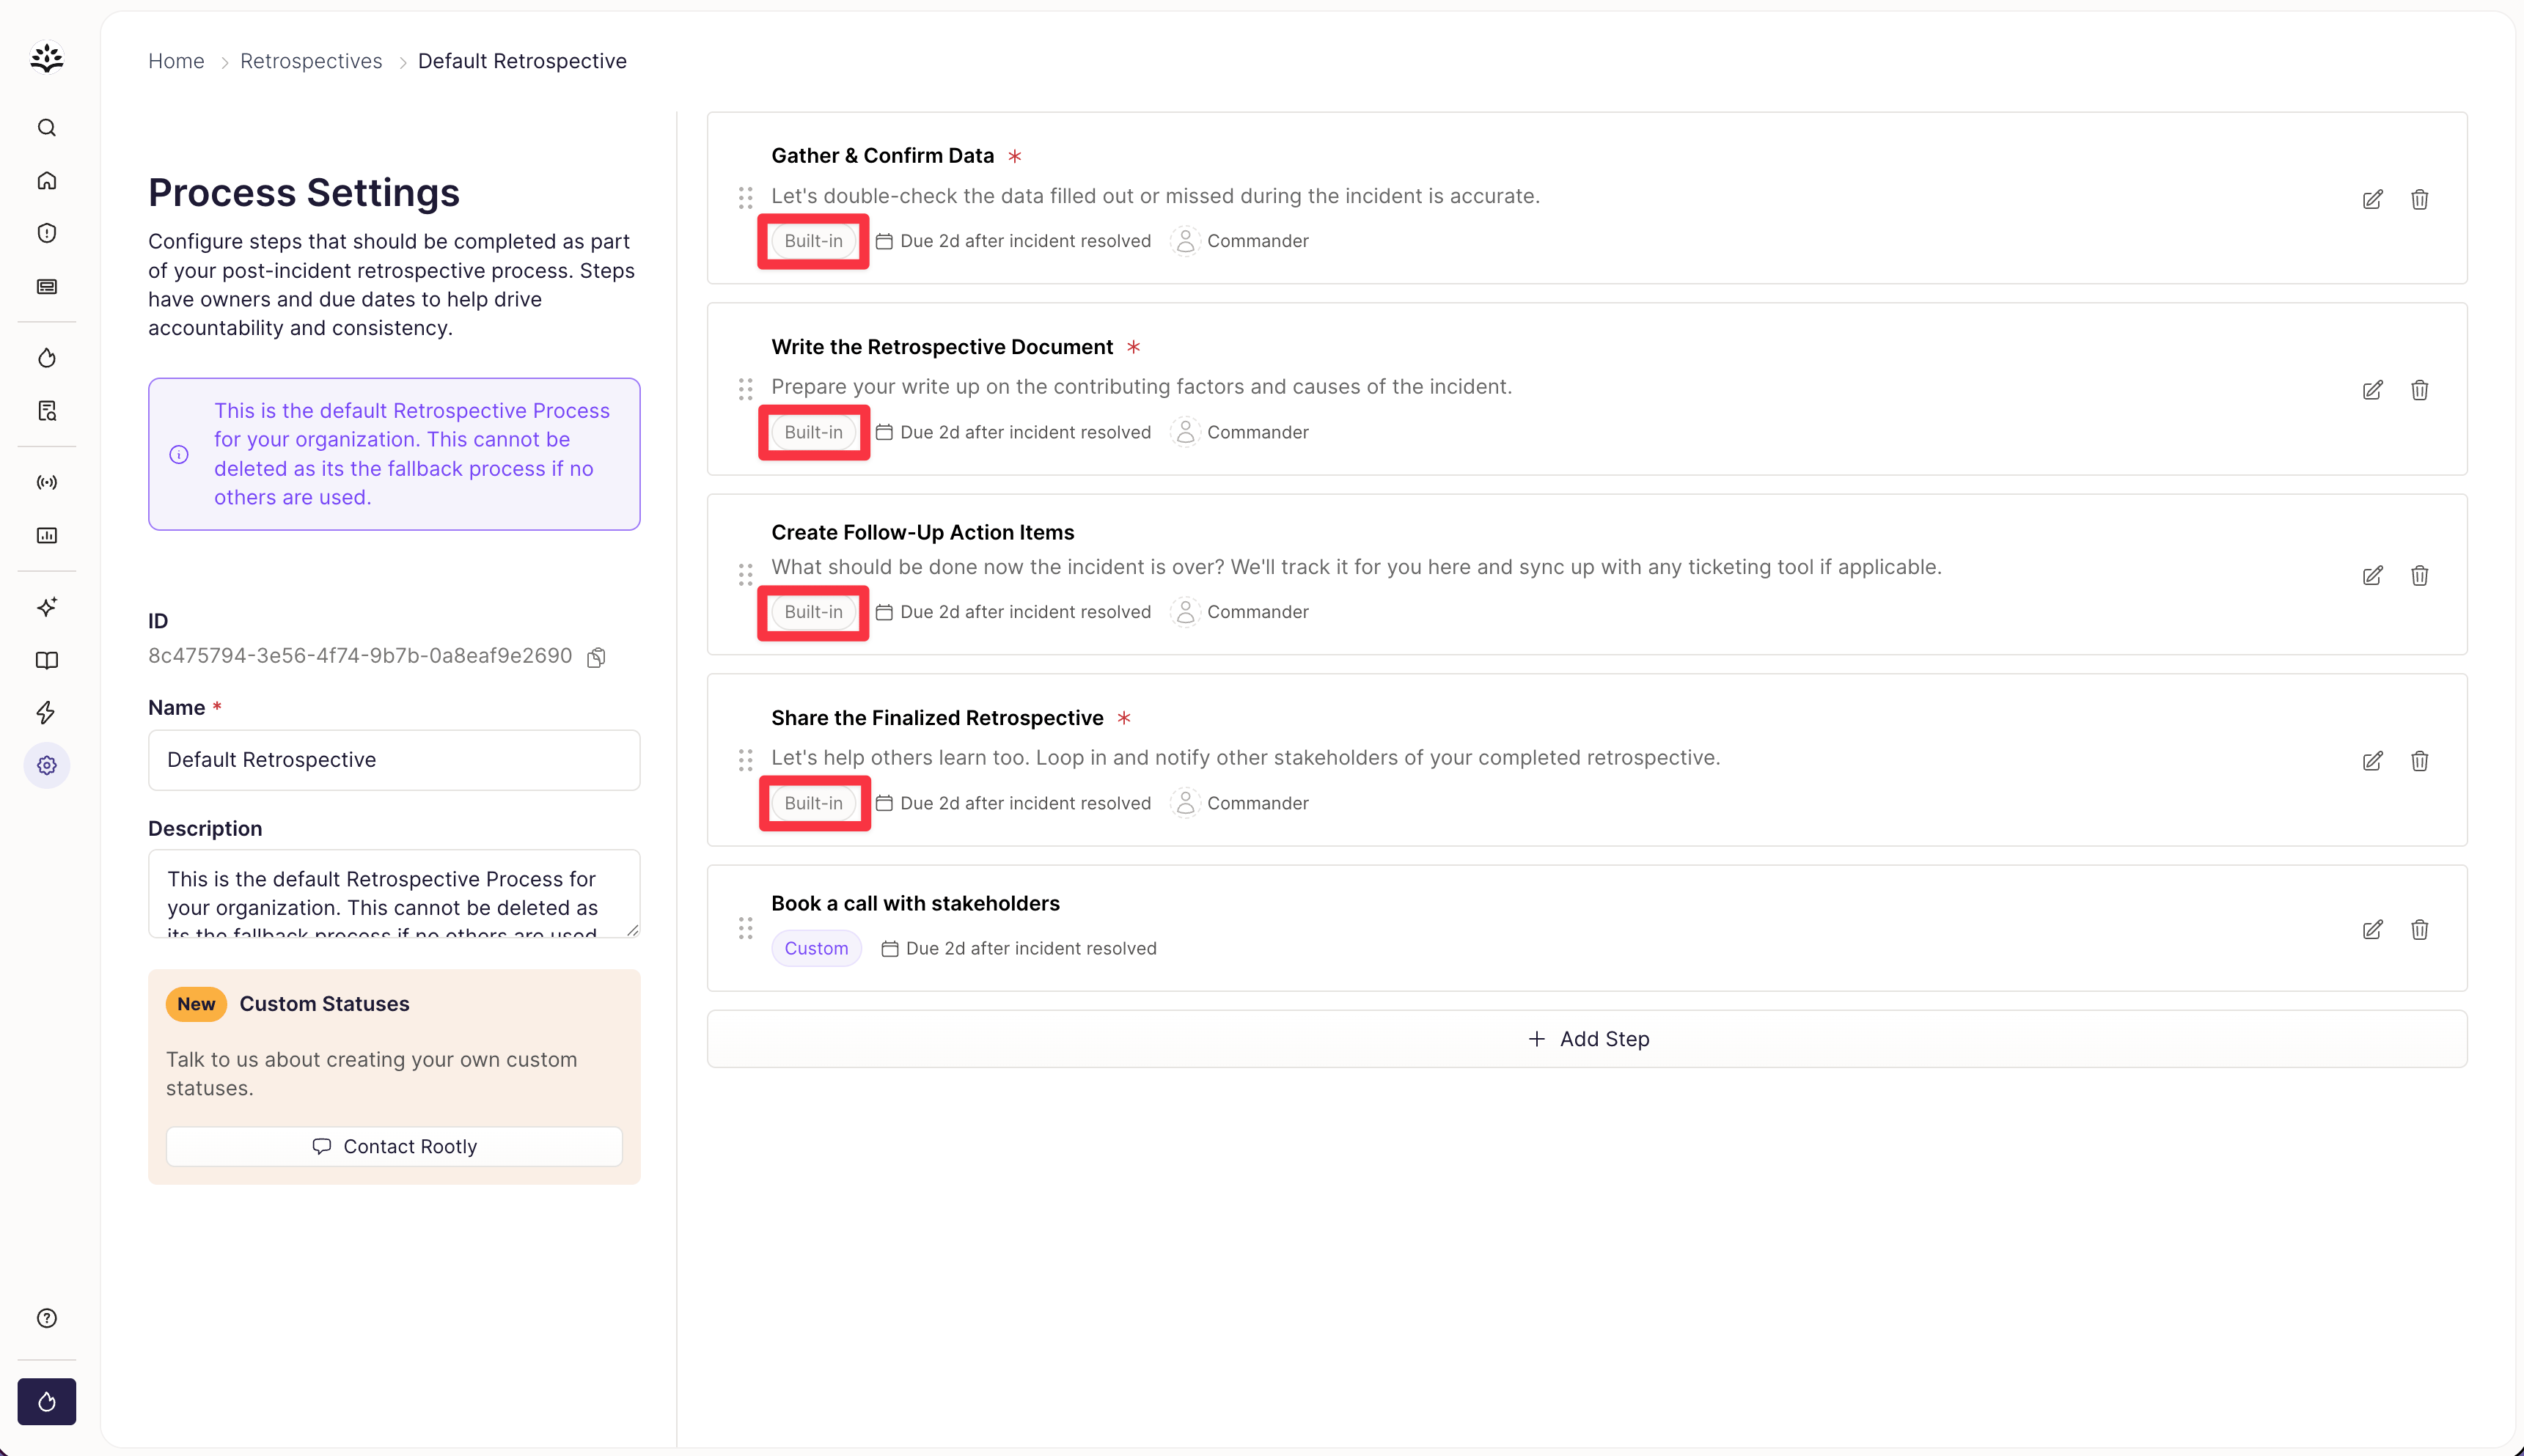 These built-in steps can be edited and deleted as needed. However, keep in mind that these steps show differently in the Retrospective tab of an incident and should be used as originally intended.
### How Built-In Steps Are Displayed
#### Gather & Confirm Data
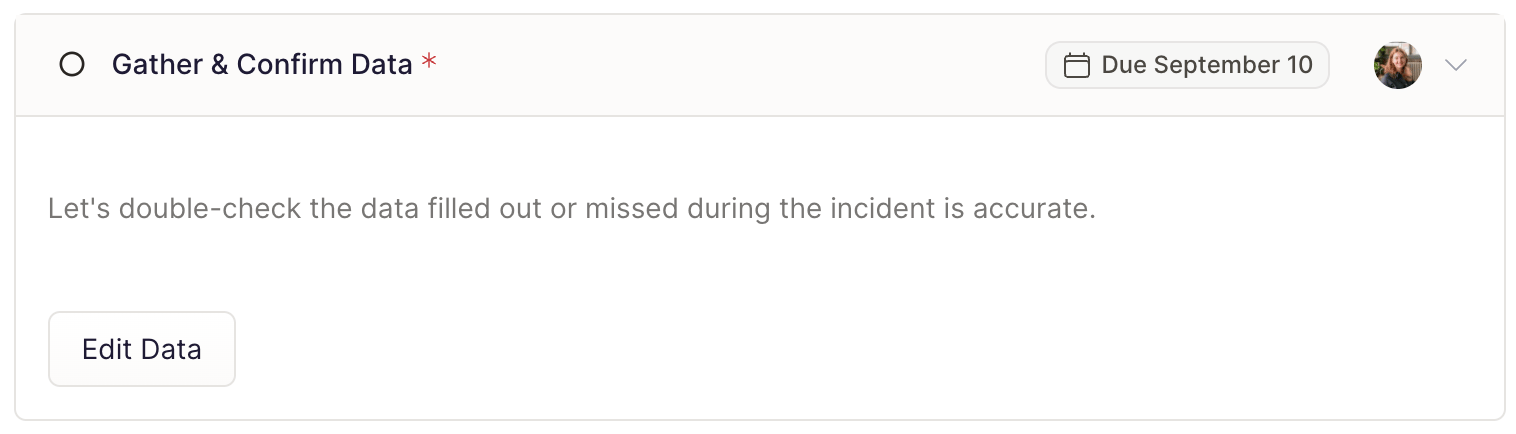
This step makes it easy for responders to fill out the necessary information for the incident. When viewing the Incident's Retrospective tab, the 'Edit Data' button makes it easy to fill out all necessary incident data in one modal.
These built-in steps can be edited and deleted as needed. However, keep in mind that these steps show differently in the Retrospective tab of an incident and should be used as originally intended.
### How Built-In Steps Are Displayed
#### Gather & Confirm Data
This step makes it easy for responders to fill out the necessary information for the incident. When viewing the Incident's Retrospective tab, the 'Edit Data' button makes it easy to fill out all necessary incident data in one modal.
 #### Write the Retrospective Document
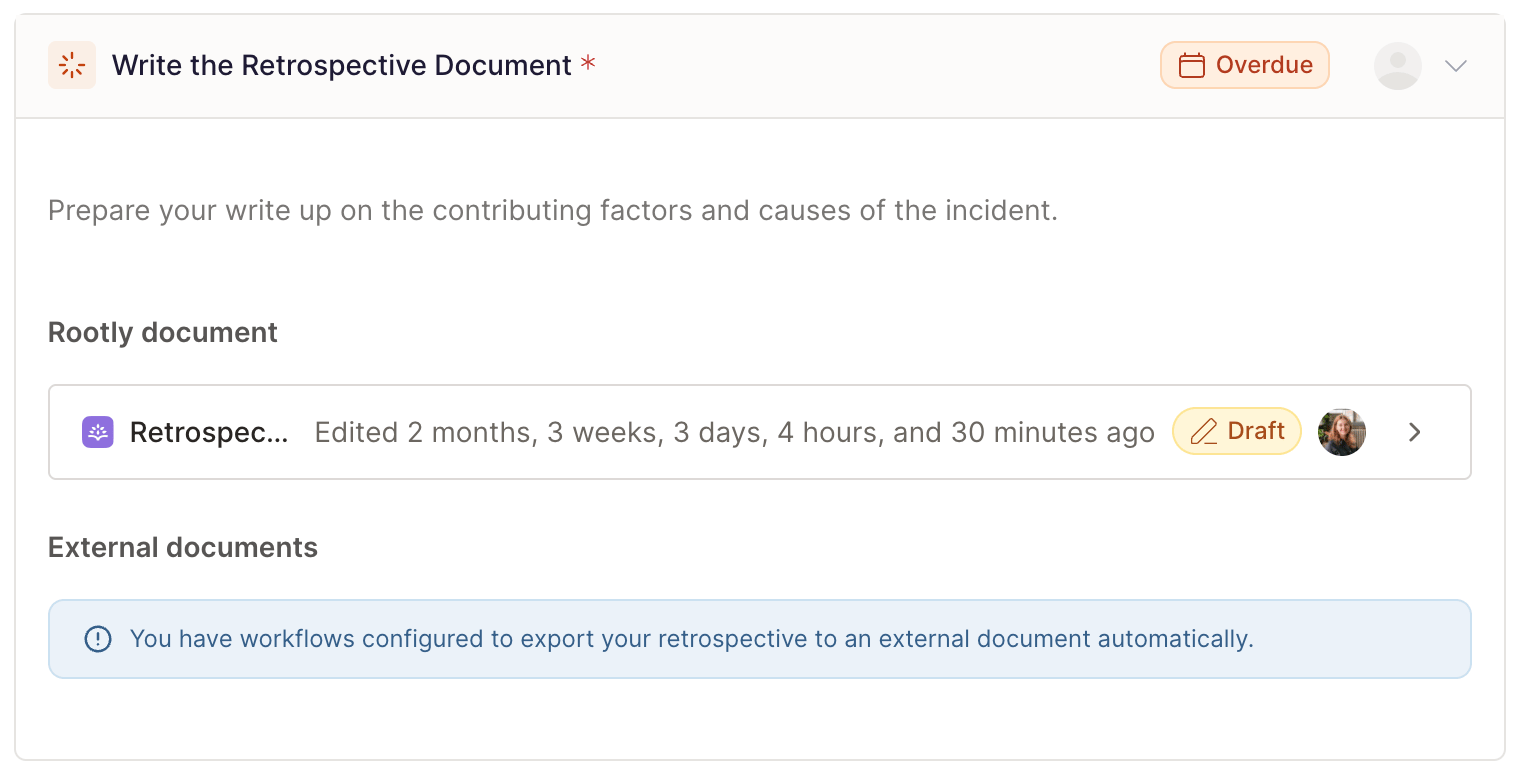
This step links any retrospective documents for easy access.
#### Write the Retrospective Document
This step links any retrospective documents for easy access.
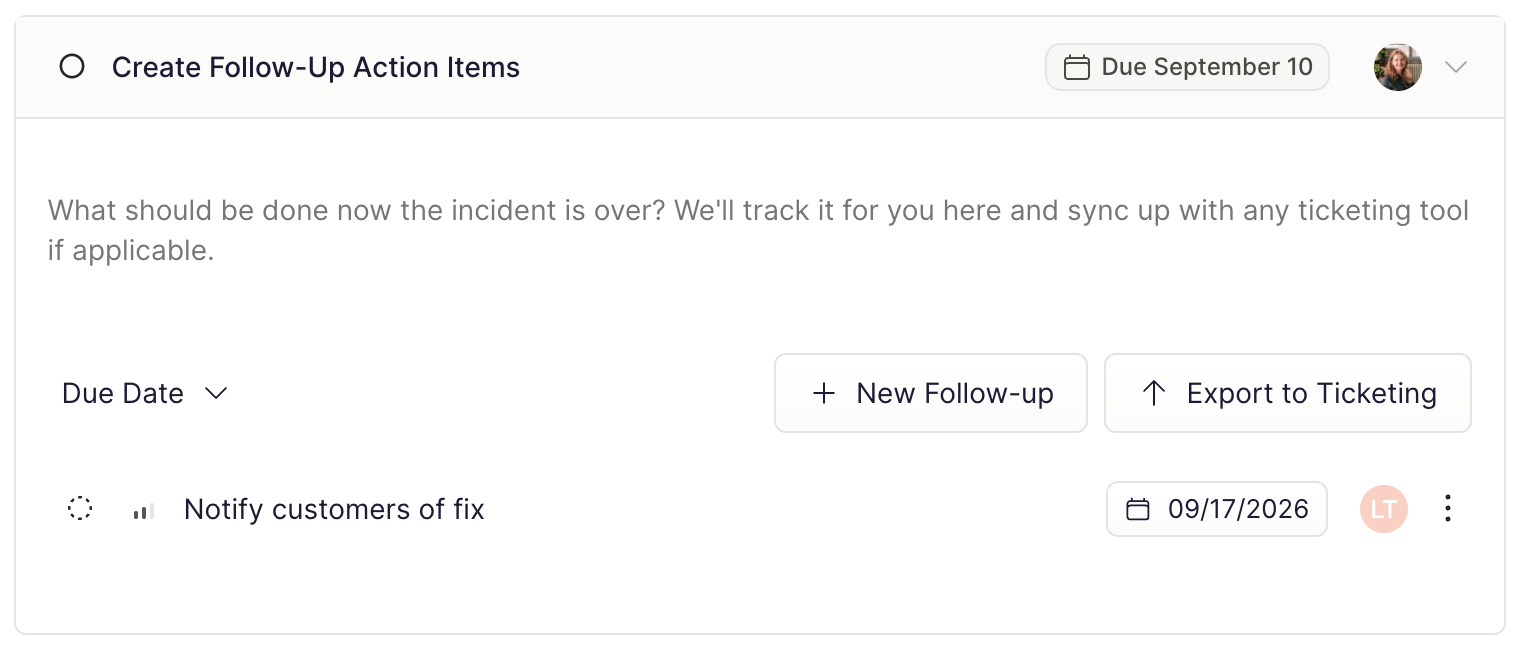
 #### Create Follow-Up Action Items
Easily create any incident follow-ups from this step. You can easily view the current status, due date, and assignee from the step as well.
#### Create Follow-Up Action Items
Easily create any incident follow-ups from this step. You can easily view the current status, due date, and assignee from the step as well.
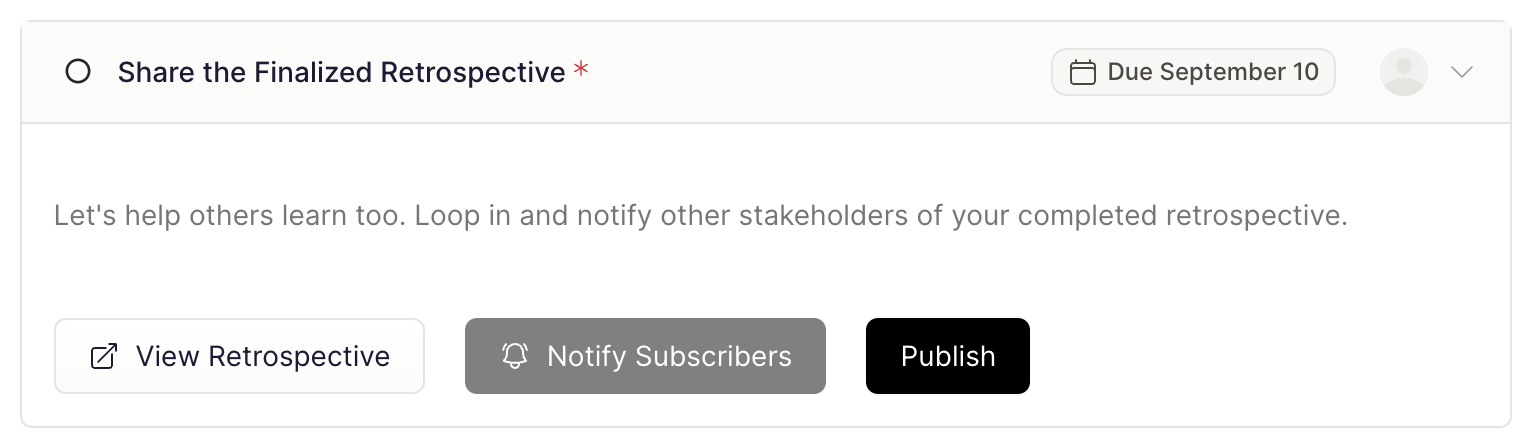
 #### Share the Finalized Retrospective
Quickly publish any retrospective documents from this step.
#### Share the Finalized Retrospective
Quickly publish any retrospective documents from this step.
 ## Editing Custom Processes
### Step Configuration Options
Each step can be configured in several ways to support your team’s process.
#### Title and Description
Use the title and description fields to clearly define what the step is for and what responders are expected to complete.
#### Required or Optional Steps
Steps can be either required or optional:
The step must be completed before the retrospective can be fully resolved. The due date can still be adjusted.
The step can be skipped if it is not needed for that incident.
#### Default Owner by Incident Role
You can assign a step to an **Incident Role** so the user holding that role on the incident becomes the default owner for the step.
This helps automatically route work to the right responder without needing to manually assign each step.
#### Due Dates
Step due dates are calculated relative to when the incident is resolved.
Due dates are:
* Based on business days after the incident is resolved
* Calculated using the team’s timezone
* Adjusted to business hours between **8am and 6pm**
* Moved forward when they would otherwise fall on a weekend
You can use standard due date options or enter a custom number of business days.
#### Reminder Notifications
Steps can send reminders to the assigned owner on any combination of channels and timings:
Where reminders are delivered. Enable one or both — Slack for real-time nudges, email for durable ones.
When reminders are sent. Combine any of the three — for example, one reminder 24 hours before the due date, one on the due date, and one after it becomes overdue.
### Process Phases With Custom Statuses
If your workspace uses **Custom Statuses**, you can assign each step to a **Retrospective Status**. This allows steps to appear in different resolved phases, such as:
* Retrospective
* Follow-ups
This is useful when your retrospective workflow spans multiple phases after the incident has already been resolved.
## Frequently Asked Questions
Each step can include a title, description, required or optional behavior, a default owner based on an Incident Role, a due date, and reminder notifications. These settings let you tailor each step to match your team’s retrospective workflow.
Due dates are based on business days after the incident is resolved. Rootly calculates them using the team’s timezone, keeps them within business hours, and skips weekends when determining the due date.
If a step is assigned to an Incident Role, the user holding that role on the incident becomes the default owner for the step. This helps automatically assign retrospective work to the right responder.
Yes. Optional steps can be skipped when they are not needed for a particular incident. Required steps must be completed before the retrospective can be resolved.
No. Every retrospective process must include at least one step. You can edit, reorder, or remove steps, but you cannot delete the last remaining step in the process.
The legacy setup creates a simplified two-step workflow by keeping only the data-gathering and retrospective-document steps in the default process. This is useful if you want a lighter process that resembles earlier retrospective behavior.
***
## Related Pages
The parent concept — processes group steps and decide which incidents get which process.
Templates define the shape of the retrospective document the write-up step produces.
The umbrella retrospectives page covering processes, editor, and AI drafting.
This documentation is built and hosted on [Mintlify](https://mintlify.com), a developer documentation platform.
## Editing Custom Processes
### Step Configuration Options
Each step can be configured in several ways to support your team’s process.
#### Title and Description
Use the title and description fields to clearly define what the step is for and what responders are expected to complete.
#### Required or Optional Steps
Steps can be either required or optional:
The step must be completed before the retrospective can be fully resolved. The due date can still be adjusted.
The step can be skipped if it is not needed for that incident.
#### Default Owner by Incident Role
You can assign a step to an **Incident Role** so the user holding that role on the incident becomes the default owner for the step.
This helps automatically route work to the right responder without needing to manually assign each step.
#### Due Dates
Step due dates are calculated relative to when the incident is resolved.
Due dates are:
* Based on business days after the incident is resolved
* Calculated using the team’s timezone
* Adjusted to business hours between **8am and 6pm**
* Moved forward when they would otherwise fall on a weekend
You can use standard due date options or enter a custom number of business days.
#### Reminder Notifications
Steps can send reminders to the assigned owner on any combination of channels and timings:
Where reminders are delivered. Enable one or both — Slack for real-time nudges, email for durable ones.
When reminders are sent. Combine any of the three — for example, one reminder 24 hours before the due date, one on the due date, and one after it becomes overdue.
### Process Phases With Custom Statuses
If your workspace uses **Custom Statuses**, you can assign each step to a **Retrospective Status**. This allows steps to appear in different resolved phases, such as:
* Retrospective
* Follow-ups
This is useful when your retrospective workflow spans multiple phases after the incident has already been resolved.
## Frequently Asked Questions
Each step can include a title, description, required or optional behavior, a default owner based on an Incident Role, a due date, and reminder notifications. These settings let you tailor each step to match your team’s retrospective workflow.
Due dates are based on business days after the incident is resolved. Rootly calculates them using the team’s timezone, keeps them within business hours, and skips weekends when determining the due date.
If a step is assigned to an Incident Role, the user holding that role on the incident becomes the default owner for the step. This helps automatically assign retrospective work to the right responder.
Yes. Optional steps can be skipped when they are not needed for a particular incident. Required steps must be completed before the retrospective can be resolved.
No. Every retrospective process must include at least one step. You can edit, reorder, or remove steps, but you cannot delete the last remaining step in the process.
The legacy setup creates a simplified two-step workflow by keeping only the data-gathering and retrospective-document steps in the default process. This is useful if you want a lighter process that resembles earlier retrospective behavior.
***
## Related Pages
The parent concept — processes group steps and decide which incidents get which process.
Templates define the shape of the retrospective document the write-up step produces.
The umbrella retrospectives page covering processes, editor, and AI drafting.
This documentation is built and hosted on [Mintlify](https://mintlify.com), a developer documentation platform.